Google Search Appliance - Connector Developer's Guide: Appendix A: Building a Debug Connector Manager
Google Search Appliance software version 6.2
Connector manager version 2.4.0
Posted December 2009
This section describes how to build a debug connector manager
and to build Javadoc. This section is useful if you need to extend
the functionality of the connector manager, or want to use the test
connectors supplied with the connector manager. You may find that
the information in the Getting Started
section provides enough background information to get you started and
to test connectors.
For connector terminology definitions, see the
Google Enterprise Glossary.
Chapters:
Home,
About This Guide,
Introduction,
Getting Started,
SPI Overview,
Traversing Documents,
Authentication,
Authorization,
Configuration,
Appendix A: Building a Debug Connector Manager
Chapter Contents: Appendix A: Building a Debug Connector Manager
- Creating a Debug Development Environment
- Downloading the Connector Manager Software
- Reviewing the Software Layout
- Downloading JSR 170 to Obtain a Jar File
- Setting Environment Variables
- Building Javadoc
- Building a Debug Connector Manager
- Deploying the Debug Connector Manager
- Configuring the Admin Console
- Testing a Connector
Creating a Debugging Development Environment
The sections that follow describe how to set up a development
environment for creating a debug connector manager and for building
the test connectors.
Downloading the Connector Manager Software
The
connector manager developer site
provides the latest download packages for the binary releases as both .zip and
.tar.gz files, and the source code archives.
The Source tab
lets you browse the source. Use Subversion to download
the source.
Download a copy of the source code for the connector manager and
SPI:
svn checkout http://google-enterprise-connector-manager.googlecode.com/svn/trunk
    google-enterprise-connector-manager
This command anonymously checks out code from the Subversion trunk and copies the code to the
google-enterprise-connector-manager folder on your computer. You can specify a different
output folder name.
Back to top
Reviewing the Software Layout
The top-level folder contains the following components:
- The
COPYING file in the google-enterprise-connector-manager
folder provides the Apache License for the software distribution.
- The
projects folder contains the following folders:
connector-manager
Source code for the connector manager and the SPI. The following folders
under the connector-manager folder provide third party production
and test libraries:
test-connectorATest connector A configuration files.
test-connectorBTest connector B configuration files. The
test connectors are identical except that in their respective configuration forms
(in the connectorType.xml files), test connector A displays the
Color parameter and test connector B displays the
Flavor parameter. Neither parameter has any significance--they
are just example values. Both test connectors call a mock repository in the
following folder:
/projects/connector-manager/source/javatests/com/google/enterprise/connector/mock
Back to top
Downloading JSR 170 to Obtain a Jar File
You need to obtain the jcr-10.jar file, which is part of
JSR 170.
Google provides a suite of internal JUnit unit tests on the
connector manager site to test the
functionality of the connector manager.
Some of those tests depend on JSR 170.
Back to top
Setting Environment Variables
Ensure that the following required environment variables are set in your build environment.
In Linux, you can use the env command to see if the variables are set.
Required Environment Variables
| Variable |
Description |
Sample Linux Path |
| ANT_HOME |
The Ant command's installation folder. |
/usr/bin/ant |
| CATALINA_HOME |
Apache Tomcat installation folder. |
/usr/local/mycompany/apps/apache-tomcat-nnn |
| JAVA_HOME |
Java Development Kit installation folder. |
/usr/local/buildtools/java/jdk1.nnn |
You can also set the following variables, which the Apache Tomcat startup
shell file (startup.sh) uses.
Optional Environment Variables
| Variable |
Description |
Sample Linux Path |
| CATALINA_TMPDIR |
Apache Tomcat temporary folder. (May point to $CATALINA_HOME.) |
/usr/local/mycompany/apps/apache-tomcat-nnn |
| JRE_HOME |
Java runtime folder. If you define, set to your Java development kit
installation folder. If you do not set, the default is $JAVA_HOME. |
/usr/local/buildtools/java/jdk1.nnn |
In Linux, you can use the following statements to assign values to each
required variable in the .bashrc file (or a similar shell initialization file):
export ANT_HOME=/usr/bin/ant
export CATALINA_HOME=/usr/local/mycompany/apps/apache-tomcat-nnn
export JAVA_HOME=/usr/local/buildtools/java/jdk1.nnn
After setting variables, reinitialize your .bashrc file with the source ~/.bashrc command.
Back to top
Building Javadoc
The
Javadoc
for the SPI is available in open source. You can optionally build your own copy of the
Javadoc using the procedure that follows.
To build a copy of the SPI Javadoc:
- Check out a copy of the connector manager source code from the Subversion
site using the following command:
svn checkout http://google-enterprise-connector-manager.googlecode.com/svn/trunk
    google-enterprise-connector-manager
- Change directory to the
projects/connector-manager folder using the following command:
cd google-enterprise-connector-manager/projects/connector-manager
- Use the following Ant command to build the Javadoc:
ant spi-javadoc
If the build is successful, the generated Javadoc files appear in the
connector-manager/doc/javadoc/2.0.0/spi folder.
- Change directory to the
spi folder using the following command:
cd doc/javadoc/2.0.0/spi
- Double-click the
index.html file to view the Javadocs.
Back to top
Building a Debug Connector Manager
The connector framework helps you create a testing (debug) connector manager .war file using Ant and a build.xml file. The debug .war file (connector-manager_debug.war) lets you build the test connectors, enable test connector access to the mock repository, and verify the feature set of the connector manager using unit tests.
Note: The .jar files for the connector manager must be built with Ant.
You can create a debug version that provides support for the test connectors, access to a mock repository, and access to unit tests for verifying the connector manager feature set.
Note: The information that follows enables you to build a debug version of the connector manager. Subsequent sections describe how to use the test connectors and access the mock repository. However, running the JUnit unit tests to verify the functionality of the debug connector manager is outside the scope of this document.
To build a debug version of the connector manager:
- Open a shell or command-line window and set the current folder to the
distribution/google-enterprise-connector-manager/projects folder.
- Download JSR-170 and copy the
jcr-1.0.jar file to the /projects/connector-manager/third-party/tests folder.
- Put the
junit.jar and ant-junit.jar files in the Ant command's lib folder if they are not already there.
- Run
ant (without arguments) from the /projects folder.
A successful build ends with the following statements:
$ ant
[...many messages...]
BUILD SUCCESSFUL
Total time: n minute n seconds
If a build is unsuccessful, correct the problems before continuing. If you see messages that package javax.jcr does not exist, ensure that the jcr-1.0.jar file is in the /projects/connector-manager/third-party/tests folder.
Back to top
Deploying the Debug Connector Manager
Deploy the connector manager's .war file. This action
makes the connector manager visible to the Admin Console and provides
access to the test connectors in the .war file. If you have
not done so already, install Apache Tomcat but do not start it. If you have
just installed Apache Tomcat, skip to Step 2 of the following procedure.
To run and test the connector manager:
- If Apache Tomcat is running, shut it down.
- If Tomcat is running, shut down Tomcat. If you are using Linux, use the
$CATALINA_HOME/shutdown.sh command and wait 30 seconds to ensure
that the Tomcat service ends.
You can check that the service stops by entering this URL:
http://127.0.0.1:8080. If the page display
server is not found, the service has stopped.
- Navigate to the
$CATALINA_HOME/webapps folder and delete
any previous connector-manager.war files or
connector-manager/ folders.
- Copy the connector manager
.war file to the Tomcat webapps folder.
Copy and rename the connector-manager_debug.war file from
the connector manager's projects/connector-manager/dist/connector-manager/
folder to the $CATALINA_HOME/webapps folder:
cp /projects/connector-manager/dist/connector-manager/connector-manager_debug.war
   $CATALINA_HOME/webapps/connector-manager.war
- Restart the Tomcat server using the
$CATALINA_HOME/bin/startup.sh command:
$ $CATALINA_HOME/bin/startup.sh
Using CATALINA_BASE:   /usr/local/mycompany/apps/apache-tomcat-nnn
Using CATALINA_HOME:   /usr/local/mycompany/apps/apache-tomcat-nnn
Using CATALINA_TMPDIR: /usr/local/mycompany/apps/apache-tomcat-nnn/temp
Using JRE_HOME:       /usr/local/buildtools/java/jdk1.nnn
- To ensure that the connector manager is online, enter the following URL in a browser:
http://127.0.0.1:8080
If Tomcat is online, the Apache Tomcat page appears. If Tomcat is offline, the page displays that the connection was reset.
Back to top
Configuring the Admin Console
After creating the connector manager, you can configure the test connector at the Admin Console.
- Log in to the Admin Console of a search appliance and register
the connector manager from the Connector Administration >
Connector Managers screen. For the connector manager you
wish to register, enter a connector manager name, description, and location.
The location has the following format:
http://machine_name:8080/folderpath/
The folderpath is the fully qualified root of the web application.
The folderpath can be a folder, such as the default, connector-manager,
for example, http://me:8080/connector-manager. On the local computer,
the folderpath could be http://localhost:8080/connector-manager/.
The folderpath depends on the name you provide for the .war file.
For example, if you name a .war file example.war on the
me server, the location folderpath would be
http://me:8080/example/.
The folderpath can also reference a proxy server depending on
how you configure your servlet container, for example,
http://me:8080/proxy/connector-manager/. In addition,
the http: part of the location can be https:
and use SSL.
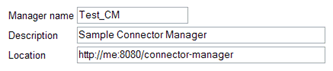
The following figure shows the prompts for registering the new
Test_CM connector manager on the me server.
The Manager name field cannot contain the <>&'" characters.
- If a connector uses content feed, in the Crawl and Index >
Crawl URLs menu of the Admin Console, add the following crawl pattern
to the Follow and Crawl Only URLs with the Following Patterns edit box:
^googleconnector://
Note: If this crawl pattern is not present, the search
appliance rejects documents from a content feed connector. Metadata-and-URL connectors
do not require the use of the googleconnector crawl pattern.
- Click Save URLs to Crawl.
- On the Crawl and Index > Feeds >
List of Trusted IP Addresses menu of the Admin Console, either
list the IP address of the servlet container in the Only trust feeds
from these IP addresses field or click Trust feeds from all
IP addresses.
Alternatively, you can list the IP address of the server where Apache
Tomcat is installed in the Only trust feeds from these IP addresses field. Click Save Settings.
Back to top
Testing a Connector
TestConnectorA and TestConnectorB provide a way to verify that you have installed the connector framework distribution correctly. The instructions that follow are for TestConnectorA--you can use the same instructions for TestConnectorB.
To test TestConnectorA:
- If you have not done so already, copy the
connector-manager_debug.war file to the Apache Tomcat webapps folder and rename the file to be connector-manager.war:
cp projects/connector-manager/dist/connector-manager/connector-manager_debug.war
     $CATALINA_HOME/webapps/connector-manager.war
- Reload the connector manager in Tomcat:
http://localhost:8080/manager/html/list --du/p:tomcat/tomcat
- Configure the Admin Console to accept the connector from Connector Administration > Connectors > Add Connector.
The following figure shows the TestConnectorA configuration form for the "Test" connector manager:
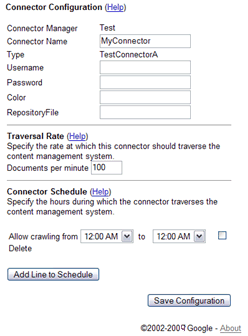
- Enter any value for the Username, Password, and Color fields (they are ignored).
-
In the
RepositoryFile field, enter the name of a text
file to crawl, for example, MockRepositoryEventLog1.txt.
(The mock repository event log files are in the Tomcat
webapps/connector-manager/WEB-INF folder.)
-
After completing the configuration form parameters, click Save Configuration.
- After the traversal and indexing completes, use the Test Center to search
documents in the mock repository text file.
You can use timestamp as a keyword to search the MockRepositoryEventLog1.txt file.
- You can verify that a search appliance is reading feeds from a connector
(or see messages about why the search appliance is rejecting documents) at
Crawl and Index > Feeds.
Wait a few minutes and the search appliance starts indexing feeds from the
connector. When a feed on the status page appears with the
Completed status, the documents in the feed appear in the search results.
Back to top
Previous Chapter: Configuration